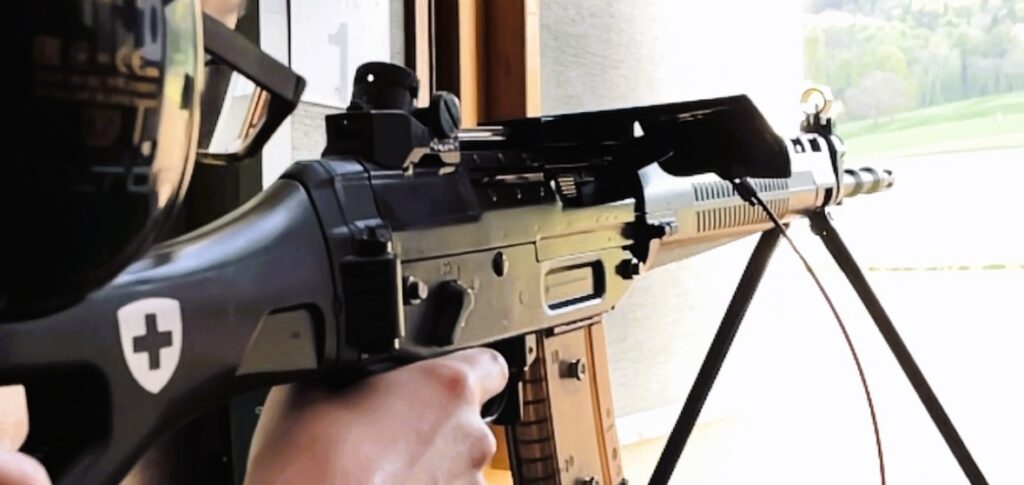
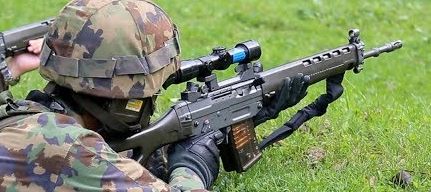
Training for the 300m shooting event
Breathing during the 300m shooting event: aim more calmly, pull the trigger more cleanly
At 300 metres, it’s not just the gun that matters. Even the slightest body movements can affect your aim. Controlled breathing helps to reduce tension, keep your aim steady and fire the shot at the right moment.
Why breath control is so important in the 300m shooting event
When shooting, the chest moves with every breath. This movement is transferred to the shoulders, the shooting position and the rifle. At close range, this is less noticeable, but at 300 metres it quickly becomes a visible difference in the group.
Irregular breathing often leads to three problems: the target shifts, the muscles tense up unnecessarily, and the shooter tries to force the shot at the wrong moment. This is precisely why breath control is one of the fundamental skills in 300m shooting.
The basics: breathe calmly, release tension, don’t force it
Many shooters make the mistake of holding their breath too early or too tightly. This does not lead to greater calm, but rather to tension in the body. The mind then becomes fixated on completing the shot, even though the sight picture and the trigger no longer align properly.
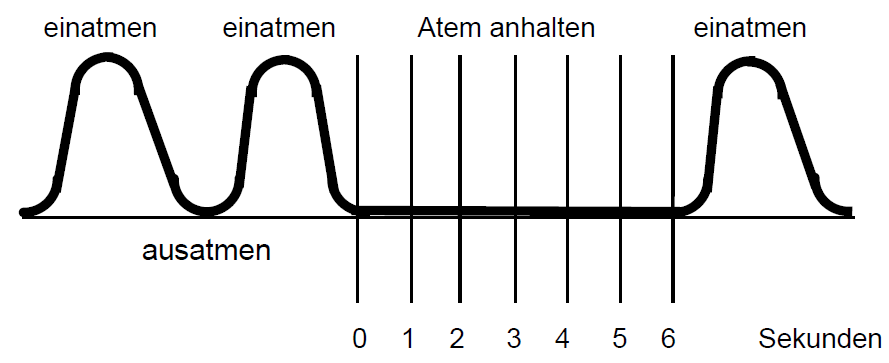
It is better to follow a natural breathing rhythm: breathe in calmly, breathe out in a controlled manner, and make use of the brief natural pause after exhaling. At that moment, the body is at its most relaxed for a few seconds.
- Breathe calmly and deeply: not slumped, but in a controlled and even manner.
- Consciously release tension: Your shoulders, hands, jaw and neck must not become tense.
- Make the most of the natural break: After exhaling, there is a brief moment of calm.
- Don’t force the shot: If he doesn't come back clean, he'll be dropped.
The breather: that brief moment of greatest stability
The breathing pause is the brief, natural moment after exhaling when the body is at its most relaxed. It lasts only a few seconds. It is precisely during this window of opportunity that the shot should be prepared and fired, provided the sight picture and trigger pull are correct.
The wording is important: a natural break. It’s not about holding your breath for as long as possible. The longer you hold your breath, the more your inner tension builds. Your aim becomes less precise, your trigger pull becomes more erratic, and the shot is more likely to be jerky.
Breathing technique cycle for the 300m shooting event
A set procedure helps to link breathing with the sight picture, aiming and the trigger pull. The following cycle is simple enough to use in training and later on under pressure.
-
Stabilise the stop Get into position, check your shoulder contact, rest your head firmly against the stock and aim the rifle naturally at the target.
-
Breathe in slowly Don’t hunch your shoulders. Your breathing should calm your body, not create additional tension.
-
Breathe out slowly As you breathe out, release the tension from your shoulders, hands and jaw.
-
Take a breather Check the target image, note the trigger point, and only fire when everything is in place.
-
Follow up After firing, stay in the follow-through position for a moment. Only then should you assess or correct your aim.
Coordination of breathing, aiming and pulling the trigger
Breathing alone is not enough. Precision only comes about when breathing, the target image and the trigger pull work together seamlessly. During the pause for breath, the shooter must not start over-analysing. At that point, it is simply a matter of calmly completing the prepared sequence.
The trigger is not pulled suddenly, but is pulled smoothly. The sight picture may move slightly during this process. No shooter remains completely still. The key is to ensure that the movement remains controlled and that the trigger is released without any sudden jerk.
Before the shot
Check your position, breathe calmly, relax your gaze, focus on the target and consciously prepare for the moment of release.
During the lull
Stop correcting yourself; don’t second-guess yourself. Keep your sights steady and pull the trigger smoothly.
After the shot
Take a moment to pause, keep breathing, and only then assess the situation objectively.
If it doesn't fit
Take a step back, take a breath and start again. A forced shot is almost always worse than a clean restart.
Shooting without time pressure and under time pressure
Without the pressure of time, the procedure can be practised deliberately and carefully. That is precisely where the foundations are laid. Under time pressure, the procedure must not become frantic, but simply needs to be carried out more efficiently.
| Situation | Procedure | What should you look out for? |
|---|---|---|
| Without any time pressure | Breathe calmly, take a moment to catch your breath, find the pressure point, and release the pressure evenly. | Precision over speed. The process must be controlled and repeatable. |
| Under time pressure | Short breathing rhythm, clear pause, smooth pull-off, moving straight into the next sequence. | You don’t get faster by rushing. Speed comes from routine, not from pressure. |
| When the shot doesn't come | Take a step back, take a deep breath, and redefine your vision. | Don’t force a shot just because you’ve been aiming for a long time. |
Common breathing mistakes
Many breathing errors are not caused by a lack of knowledge, but by pressure. The shooter wants to complete the shot, even though their body is already signalling that the technique is no longer correct.
- Stopping for too long: After a few seconds, the tension rises. The image doesn't get any better; in fact, it gets worse.
- Stopping too early: If you get bogged down before you’ve even reached your final goal, you’ll put yourself under unnecessary time pressure.
- Shallow breathing: Short, rapid breaths increase arousal and muscle tension.
- Force a shot: If the sight picture and the trigger pull don’t match up, it’s better to take a step back.
- React immediately after the shot: If you stop or look away too soon, it will disrupt the tracking.
How to practise breathing techniques effectively
Breathing techniques are not something you learn just before a competition or shortly before a series. They must be practised so often that they come naturally at the shooting range. A combination of dry runs, calm shooting sessions and careful analysis is particularly effective.
A quick exercise for your training
-
Prepare five dry runs Set up the stance without ammunition and consciously go through the breathing pattern.
-
Just focus on your breathing and the trigger Scoring or points are irrelevant in this exercise. What matters is performing the movements correctly.
-
Stop the process if it is not running smoothly Don’t give up. Take a deep breath, rebuild, start afresh.
-
Followed by five sharp shots Use the same routine. Only assess your performance after the set.
More practical knowledge for better shooting
In the Tips & Tricks section, you’ll find further practical guides for your training: from breathing techniques and concentration to setting goals and advanced shooting techniques.
Much progress is made right at the shooting range. Observe proper techniques, ask experienced shooters and train regularly with a clear focus.
See more tips and tricksTraining at the club makes all the difference
Technique, breathing and trigger control are best improved under real-life conditions. At the club, you’ll receive feedback from experienced shooters, spot mistakes more quickly and, step by step, develop a more consistent technique.
Regular training with clear guidance is often the difference between the occasional good shot and consistent performance.
Become a memberConclusion: Control leads to precision
Proper breathing is no trivial matter. It affects your physical composure, your aim, your trigger pull and your mental stability. If you are aware of your breathing rhythm and make conscious use of the natural pause between breaths, you will create better conditions for accurate shots at 300 metres.
The key is to keep the process simple: get into position, breathe calmly, use the natural pause in your breath, pull cleanly, follow through and, if necessary, start again.
Interested in shooting sports?
Experience the fascination of shooting in a community of like-minded people. Our modern shooting centre in the Zürcher Weinland offers ideal conditions for training and socialising. Whether you are a beginner or an experienced shooter - you are very welcome here!
Learn more